Installation procedure
We will use the APT (Advanced Packaging Tool) which install packages and manage dependencies automatically and take care of their configuration files while upgrading [see here for apt commands.]
| Matlab Installation |
- Go on http://swdb.ucl.ac.uk
- Search for Matlab
- Download the Licence file for the UCL Licence Manager
- Download Matlab 2014a linux: matlab_R2014a_glnxa64.zip
- Download the licence network.lic
Run the Matlab Installer:
- cd ~/Applications/MATLAB_dir
- sudo ./install
- Use the provided Installation Key
- Use the Typical Installation
- Licence file location to be provided: ~/Applications/MATLAB/network.lic
- Check box ‘create symbolic link to matlab in /usr/local/bin’
The MathWorks Installer box will pop up. Full path for installation Folder: /usr/local/MATLAB/R2014a
In case Matlab doesn’t launch from any directory:
- gedit ~/.bashrc
- source ~/.bashrc
- [an other solution for substitute users: sudo ln -s /opt/matlab/R2013a/bin/matlab matlab]
Create your alias: alias matlab=”/opt/matlab/R2013a/bin/matlab”
| Matlab Toolbox for Dimensionality Reduction |
[web site: Matlab toolbox for dimensionality reduction]
- Download the ToolBox
- Extract the files: tar -xvf drtoolbox.tar.gz
- Copy this toolbox in /usr/local/MATLAB/R2014a/toolbox/
- Start matlab with sudo matlab
- Select ‘Set path…’ from the File menu. Click the ‘Add with subfolders…’ button, select the folder /usr/local/MATLAB/R2014a/toolbox/drtoolbox in the file dialog, and press Open. Subsequently, press the Save button in order to save your changes to the Matlab search path. The toolbox is now installed.
| Matlab GE Toolbox:pettoolbox and motiontoolbox |
- Download the GEToolBox
- open matlab
- Select ‘Set path…’ from the File menu. Click the ‘Add with subfolders…’ button, select the folder …/PTBREL2.0_UCL/pettoolbox and …/PTBREL2.0_UCL/motiontoolbox in the file dialog, and press Open. Subsequently, press the Save button in order to save your changes to the Matlab search path. The toolbox is now installed.
- If you do not already have one, create a startup.m in your MATLAB directory with the following command lines
- Open Matlab and type: startup
pettoolboxpath=’/home/…./PTBREL2.0_UCL/pettoolbox’; % adjust this to wherever you put the pettoolbox
addpath(pettoolboxpath);
init_pettoolbox
motiontoolboxpath=’/home/…./PTBREL2.0_UCL/motiontoolbox/matlab’;
addpath(motiontoolboxpath);
init_motiontoolbox
| AMIDE: Amide’s a Medical Imaging Data Examiner |
First we need to install a few packages before installing Amide. These packages will allow us to open DICOM format data [see here for the list of packages that you might need.]
1) XMEDCON installation:
2) GSL installation:
3) add PATHS in your ~/.bashrc:
5) Install AMIDE now:
Download the source code [here].
You might get the following warning messages:
Gtk-WARNING **: Attempting to store changes into `/root/.local/share/recently-used.xbel’, but failed: Failed to create file ‘/root/.local/share/recently-used.xbel.ZHBB8W’: No such file or directory
Gtk-WARNING **: Attempting to set the permissions of `/root/.local/share/recently-used.xbel’, but failed: No such file or directory
The error shows that Gtk attempting to get read/write access and try to save (temporary) files in the directory. This is not working because this folder is missing, see the last part of the first line of the error: No such file or directory. The solution is to manually create this folder: sudo mkdir -p /root/.local/share
The compiler was not properly installed: sudo apt-get install g++
Which gcc version:
gcc -v
Which GTK+ version:
dpkg -l libgtk[0-9]* | grep ^i
find /usr/lib -name *libgtk*
./configure
make
sudo make install
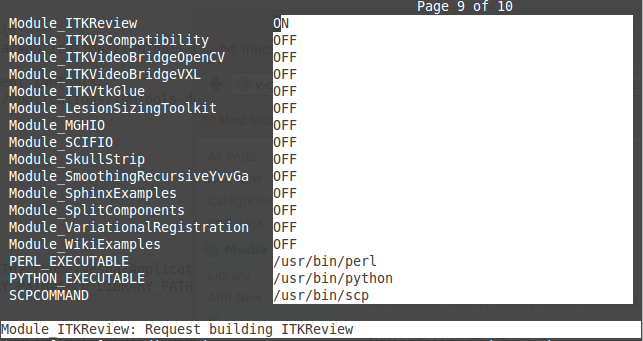
| ITK (Insight Tool Kit) Installation |
[Press [c] to ‘Configure’]
[this is needed by the INMTools because the ITKGeometryImageFilter is in the ITKReview module]
| INMTools |
The following packages are needed:
CMAKE_BUILD_TYPE Release
CMAKE_INSTALL_PREFIX /home/…/Applications/INMTools/install
ITK_DIR /usr/local/lib/cmake/ITK-4.7
| GIF CMIC |
[Press [c] to ‘Configure’]
add PATHS in your ~/.bashrc:
| PVC |

/usr/local [or an other place that you would have created, for example: ~/Applications/PETPVC/PETPVC-install]
[sudo if you install in /usr/local]
| GATE Installation (and CLHEP, ROOT, GEANT4) |
http://wiki.opengatecollaboration.org/index.php/New_Compilation_ProcedureV6.2
* CLHEP, ROOT and GEANT4 are needed.
* git clone http://git.opengatecollaboration.org/git/opengate-public.git
* rename opengate-public as gate_v6.2
* create gate.6.2-build and gate.6.2-install
* in gate.6.2-build: ccmake ../gate_v6.2
* the install directory should be /PATHTOGATE/gate.6.2-install
* make -j8 and make install
| ROOT Installation |
http://root.cern.ch/drupal/content/installing-root-source
cd root
git tag -l
git checkout -b v5-34-08 v5-34-08
./configure
make
add the following in your bashrc:
PATH=/home/uclh-vesna-mint/Applications/root/bin:$PATH
export LD_LIBRARY_PATH=${LD_LIBRARY_PATH}:/home/uclh-vesna-mint/Applications/root/lib
| GEANT4 Installation |
http://geant4.web.cern.ch/geant4/support/download.shtml
* Create two directories to build and install GEANT4 (geant4.9.5.p02-build and geant4.9.5.p02-install)
* In the build directory: ccmake ../geant4.9.5.p02
* Configure
* GEANT4_INSTALL_DATA and GEANT4_USE_SYSTEM_CLHEP are mandatory.
* Add paths to CLHEP_LIBRARY to point to the libCLHEP-2.1.1.0.so
* Needs the following packages (sudo apt-get install libxt-dev libibtk-dev freeglut3-dev libxmu-dev qt4-dev-tools)
* make -jN (N is the number of processor(s) in your PC)
* make install
| NiftySEG Installation |
Look at the latest code at http://sourceforge.net/p/niftyseg/code/HEAD/tree/
Clicking on History shows that [r162] has been modified on 2014-04-15 16:20:17
sudo apt-get install subversion
svn checkout http://svn.code.sf.net/p/niftyseg/code/ niftyseg-code
>>>>> Checked out revision 162.
* Create 2 directories: niftyseg-build and niftyseg-install at the same level as the actual source code niftyseg-code
* cd niftyseg-build
* ccmake ../niftyseg-code
* Press [c] to ‘Configure’
* Press [g] to ‘Generate and Exit’
* make
* make install
| Working on the UCL cluster Legion |
* https://wiki.rc.ucl.ac.uk/wiki/Legion_user_environment
* ssh -Y uclid@legion.rc.ucl.ac.uk
How to load Matlab:
* module avail
* module load compilers/gnu/4.6.3
* module load matlab/full/r2013a/default


